
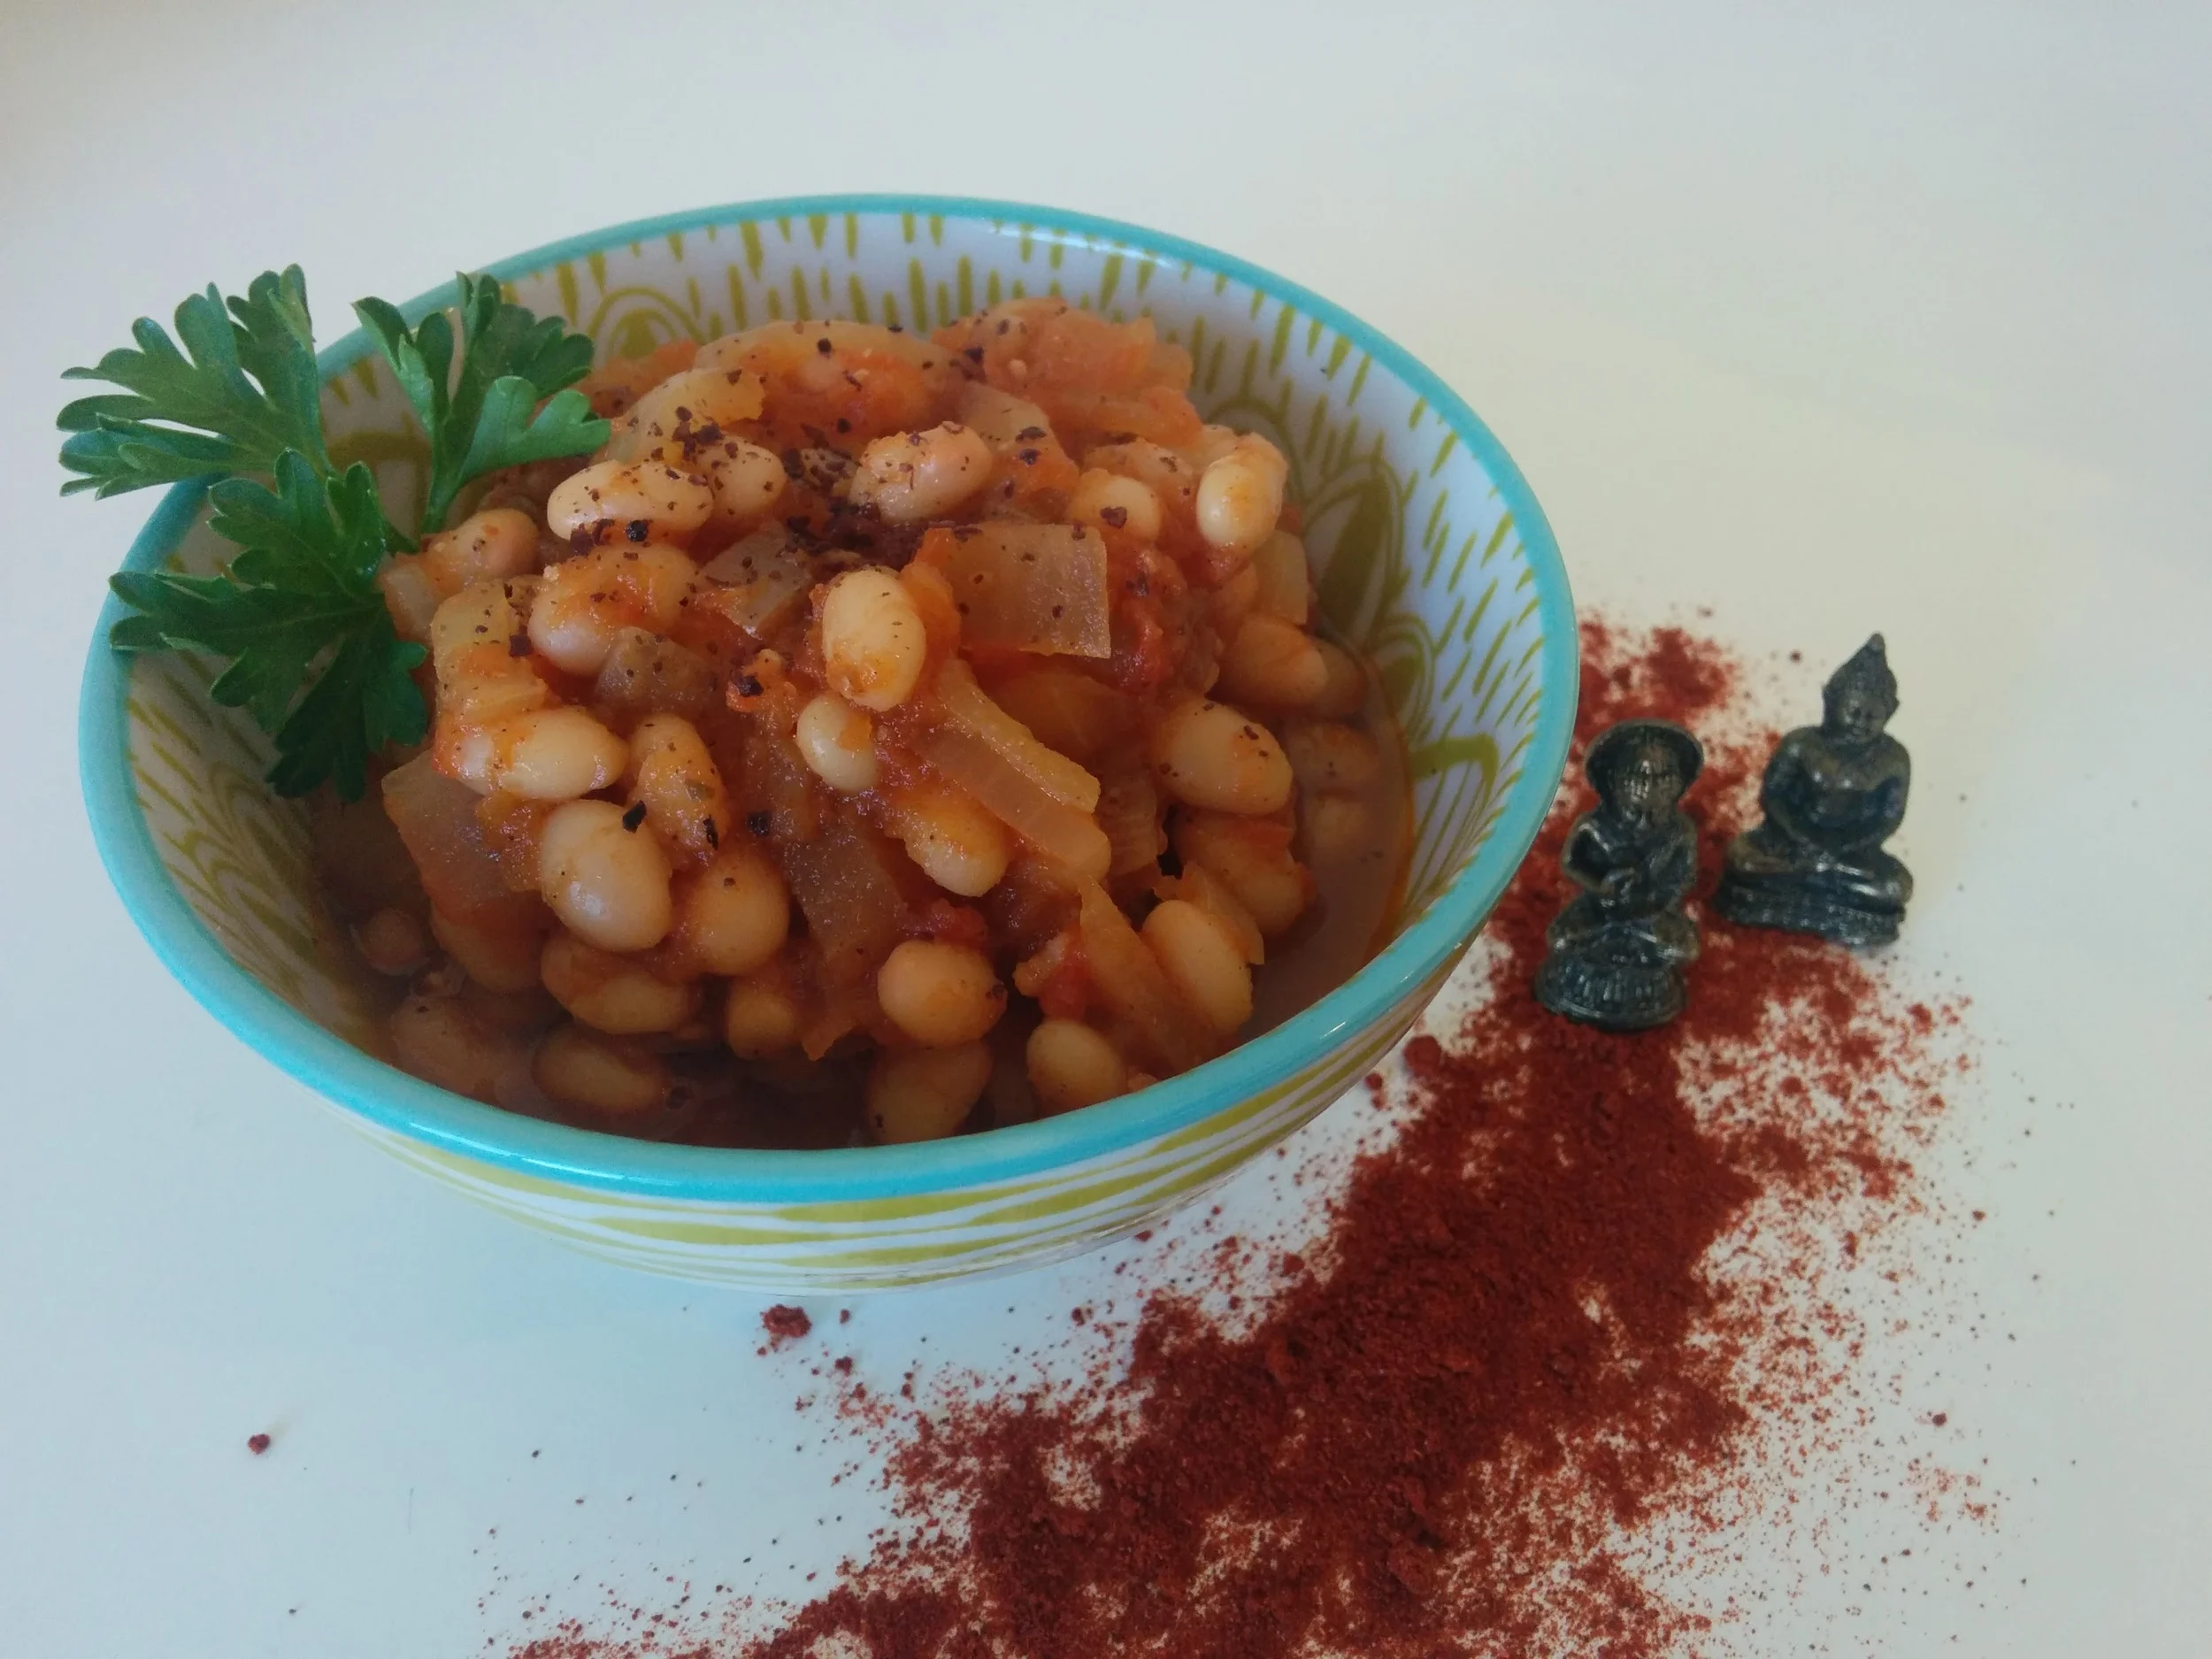
smokey baked beans
Moving to the USA has been wonderful for so many reasons but there are a few comforts i really miss. One of them is BAKED BEANS!!! Now, the real deal are actually full of sugar and the low sugar version just don't taste as good, so I decided to make my own. Once I realised how super yummy and really easy they are to make I can't understand why anyone would eat them from a can! The secret of this recipe is to let the sauce reduce as much as possible before adding the beans, this way you get the sweetness that is just so morish.
You will need:
- a tin of navy beans, pinto beans OR cannellini beans (they all work well)
- a brown onion diced
- mirin (I use this instead of sugar, it's a Japanese sweet wine vinegar)
- Worcestershire Sauce
- Smokey Paprika
- Salt & Pepper
- Tomato Paste
- Tin of crushed tomatoes
gently saute the onions until golden in a pan, then add mirin and Worcestershire sauce (about a tablespoon of each, you can add more to taste later). Let that reduce with the onions. Then add the tin of crushed tomatoes and tomato paste. if you don't have a tin of tomatoes, you can just use tomato paste and water and use most of the tube of paste. Again, leave that to bubble for at least 20 - 30 minutes until it reduces to a nice thick sauce.
Wash and drain the beans and add. leave to cook for about 10 minutes until the beans are cooked then taste. Add more seasoning until you get the flavour desired. serve with smokey paprika on top to get that nice smokey taste too.
cheats chocolate cake
On my hunt to find the perfect birthday cake for Reno's 2nd birthday coming up in 2 weeks, I have been trawling lots of ideas and dinosaur cake designs. That all lead me to discovering both a paelo chocolate cake and a yogurt chocolate cake.
So I decided to combine the two to make an EPIC 'cheats chocolate' cake. Now I have made it, I think it's far too grown up for a kids birthday party as it comes out all gooey, luxurious like soft chocolate fudge . Not the best for cutting into a dinosaur shape, but I am happy I discovered it non the less. Anyone who is free this week and fancies a piece with a cup of coffee, just holla me up!
From the recipe's I found, I halved the sugar to just 1/2 cup coconut sugar, rather than the 1 cup specified. Then I realised I was going for a 3 egg version and after cracking open the egg box, I discovered I only had 1 egg. So I had to think fast " what can I use when I have a 3 egg recipe and only have 1 egg???"
At the very back of my fruit drawer in the fridge I see a VERY black, sad old banana... Perfect. 1/2 a banana acts as 1 egg, so this will do just great. My husband hates bananas and what was awesome about this cake mix was I gave him the spoon to lick and as it was only 1 banana he couldn't taste it and so that was the check mark for me to know I was onto something good ;)
You could make this with either the banana sub, OR 3 eggs. FYI... The banana added another dimension to the flavour which was nice, and again took the edge of the chocolate and sweetness. Granted, I did add a handful of chocolate chips into the batter so it was pretty intense. It was Sunday, I was feeling rebellious ;)
I also realised mid prep that I was clean out of vanilla extract. So, don't forget to add that, you could also add a tablespoon of coffee liquor or an espresso shot if you fancy being a bit more grown up about it too.
So, to make this combo harvester cheat cake you will need:
- 1 cup of plain flour (you could totally sub for rice flour I reckon if you want GF)
- 1/2 cup good quality coco powder
- 1 teaspoon baking powder
- 1/2 teaspoon baking soda
- 1/2 teaspoon salt
- 1/2 cup coconut sugar
- 1 cup greek yogurt
- 1 banana
- 1 egg
- 1/2 cup coconut oil
- optional vanilla extract / coffee liquor / espresso shot
- I put all the dry ingredients into the main bowl and stir them together
- In a small bowl I beat the egg, added the mashed banana and yogurt and blitzed with the hand whisk.
- I melted the coconut oil and let it cool then added that to my wet ingredients.
- Mix the wet into the dry with the hand whisk to get a luxurious texture.
- For extra decadence I added a handful of chocolate chips
- put it in a 9inch round cake tin so it fills up nicely, it doesn't rise too much
- bake at 350 / 180 for 45 minutes, the knife will come out so clean!
- set it to cool before trying to present or it will fall apart :)
- put some more of the chocolate chips on top and let them melt and smooth out to make a topping, then i added a handful of raspberries for decoration.


Leviva Gvena
"Leviva Gvena" - the secret recipe of my mother in law of the golden nuggets that everyone seems to flock to at all family events in Israel. The literally translation from hebrew is cheese pancakes and I could never understand what all the fuss was about when I first started dating my husband and was going to his family's house for events as they took me a while to fall in love with them, but now I get it. These things are delicious and also super easy to make if you are not sure what to have for dinner with the kids and want to have a nice treat.
These things re FULL of fat and there is nothing 'whole food' about them, but they are glorious, and such fun comfort food, or a perfect dish to serve at Shavout, the Jewish festival that celebrates all things dairy related. They are basically a cheese heavy pancake batter, but we make them with rice flour which makes them lighter and instead of just cream cheese, I add some cottage cheese into the mix to make them fluffier.
You will need:
- 1 block or tub of cream cheese
- 1/2 a tub of cottage cheese
- 1 large egg (or 2 regular size)
- 1 table spoon of agave syrup
- pinch salt
- 6 tablespoons of rice flour
- empty the whole tub of cream cheese and half tub of cottage cheese into a bowl, mash up together with a fork
- add the eggs - beat it all together to make a creamy mixture
- add the agave and salt then spoon in the flour on spoon at a time until you get a nice batter that doesn't slip off your spoon.
- leave to stand in the fridge for 10 minutes
- heat up oil in a big frying pan (use a light oil that heats well like canola oil, don't use olive oil) and spoon tea spoon size amounts into the pan and fry on each side till golden
- place on kitchen roll to remove excess oil before serving.
- These little golden nuggets of joy taste better when cooled, but they rarely last that long in my house!

Maple, Almond & Pear Magic
This cake came out soooo delicious, I have had everyone who has eaten it make me give them the recipe before leaving my house! I had to remember what I actually put in the cake first! Oh yes it's also Gluten Free. Unfortunately or fortunately, it's defiantly NOT lactose free as I think what makes this cake so yummy was the cup of greek yogurt I threw into the mixture to thicken it up.
So here, I share it with you. It's SO simple and SO yummy and SO fun to make if you have people coming over to share with you. It was also brilliant as I had one old and sad looking pear in the fridge that I had NO idea what to do with but was never going to taste as good on it's own as it does glorified and celebrated in this cake. In hindsight, if your pear is as sweet as mine was (test it before you make the cake) you could get away with slightly less maple syrup too if you like... just a thought...
You will need:
- 3/4 cup coconut oil - melted
- 1/2 cup maple syrup
- 1 teaspoon vanilla extract
- 1/4 teaspoon almond extract
- 1/4 teaspoon of freshly ground nutmeg
- 1/4 teaspoon of cinnamon
- pinch salt
- 3 eggs
- 1 cup greek yogurt
- 1 cup rice flour
- 1 cup almond meal
- 1/2 teaspoon baking powder
- 1/4 teaspoon baking soda
- 2 tablespoons of flax meal
- 1 pear
- melt the coconut oil and add the maple syrup, vanilla, nutmeg, cinnamon salt and almond extract and blend with hand mixer
- add 3 eggs, blitz, then the yogurt. You will have a nice golden creamy coloured mixture.
- add the rice flour, powder, soda, flax meal and almond meal, stir in to form a lovely thick nutty looking batter
- in a loaf tin layer slices of pear to cover the bottom.
- add half the batter - then add another layer of pears, then add the rest of the batter
- cook in oven at 350 / 180 for 45 minutes, until knife comes out clean and it's deep golden brown.


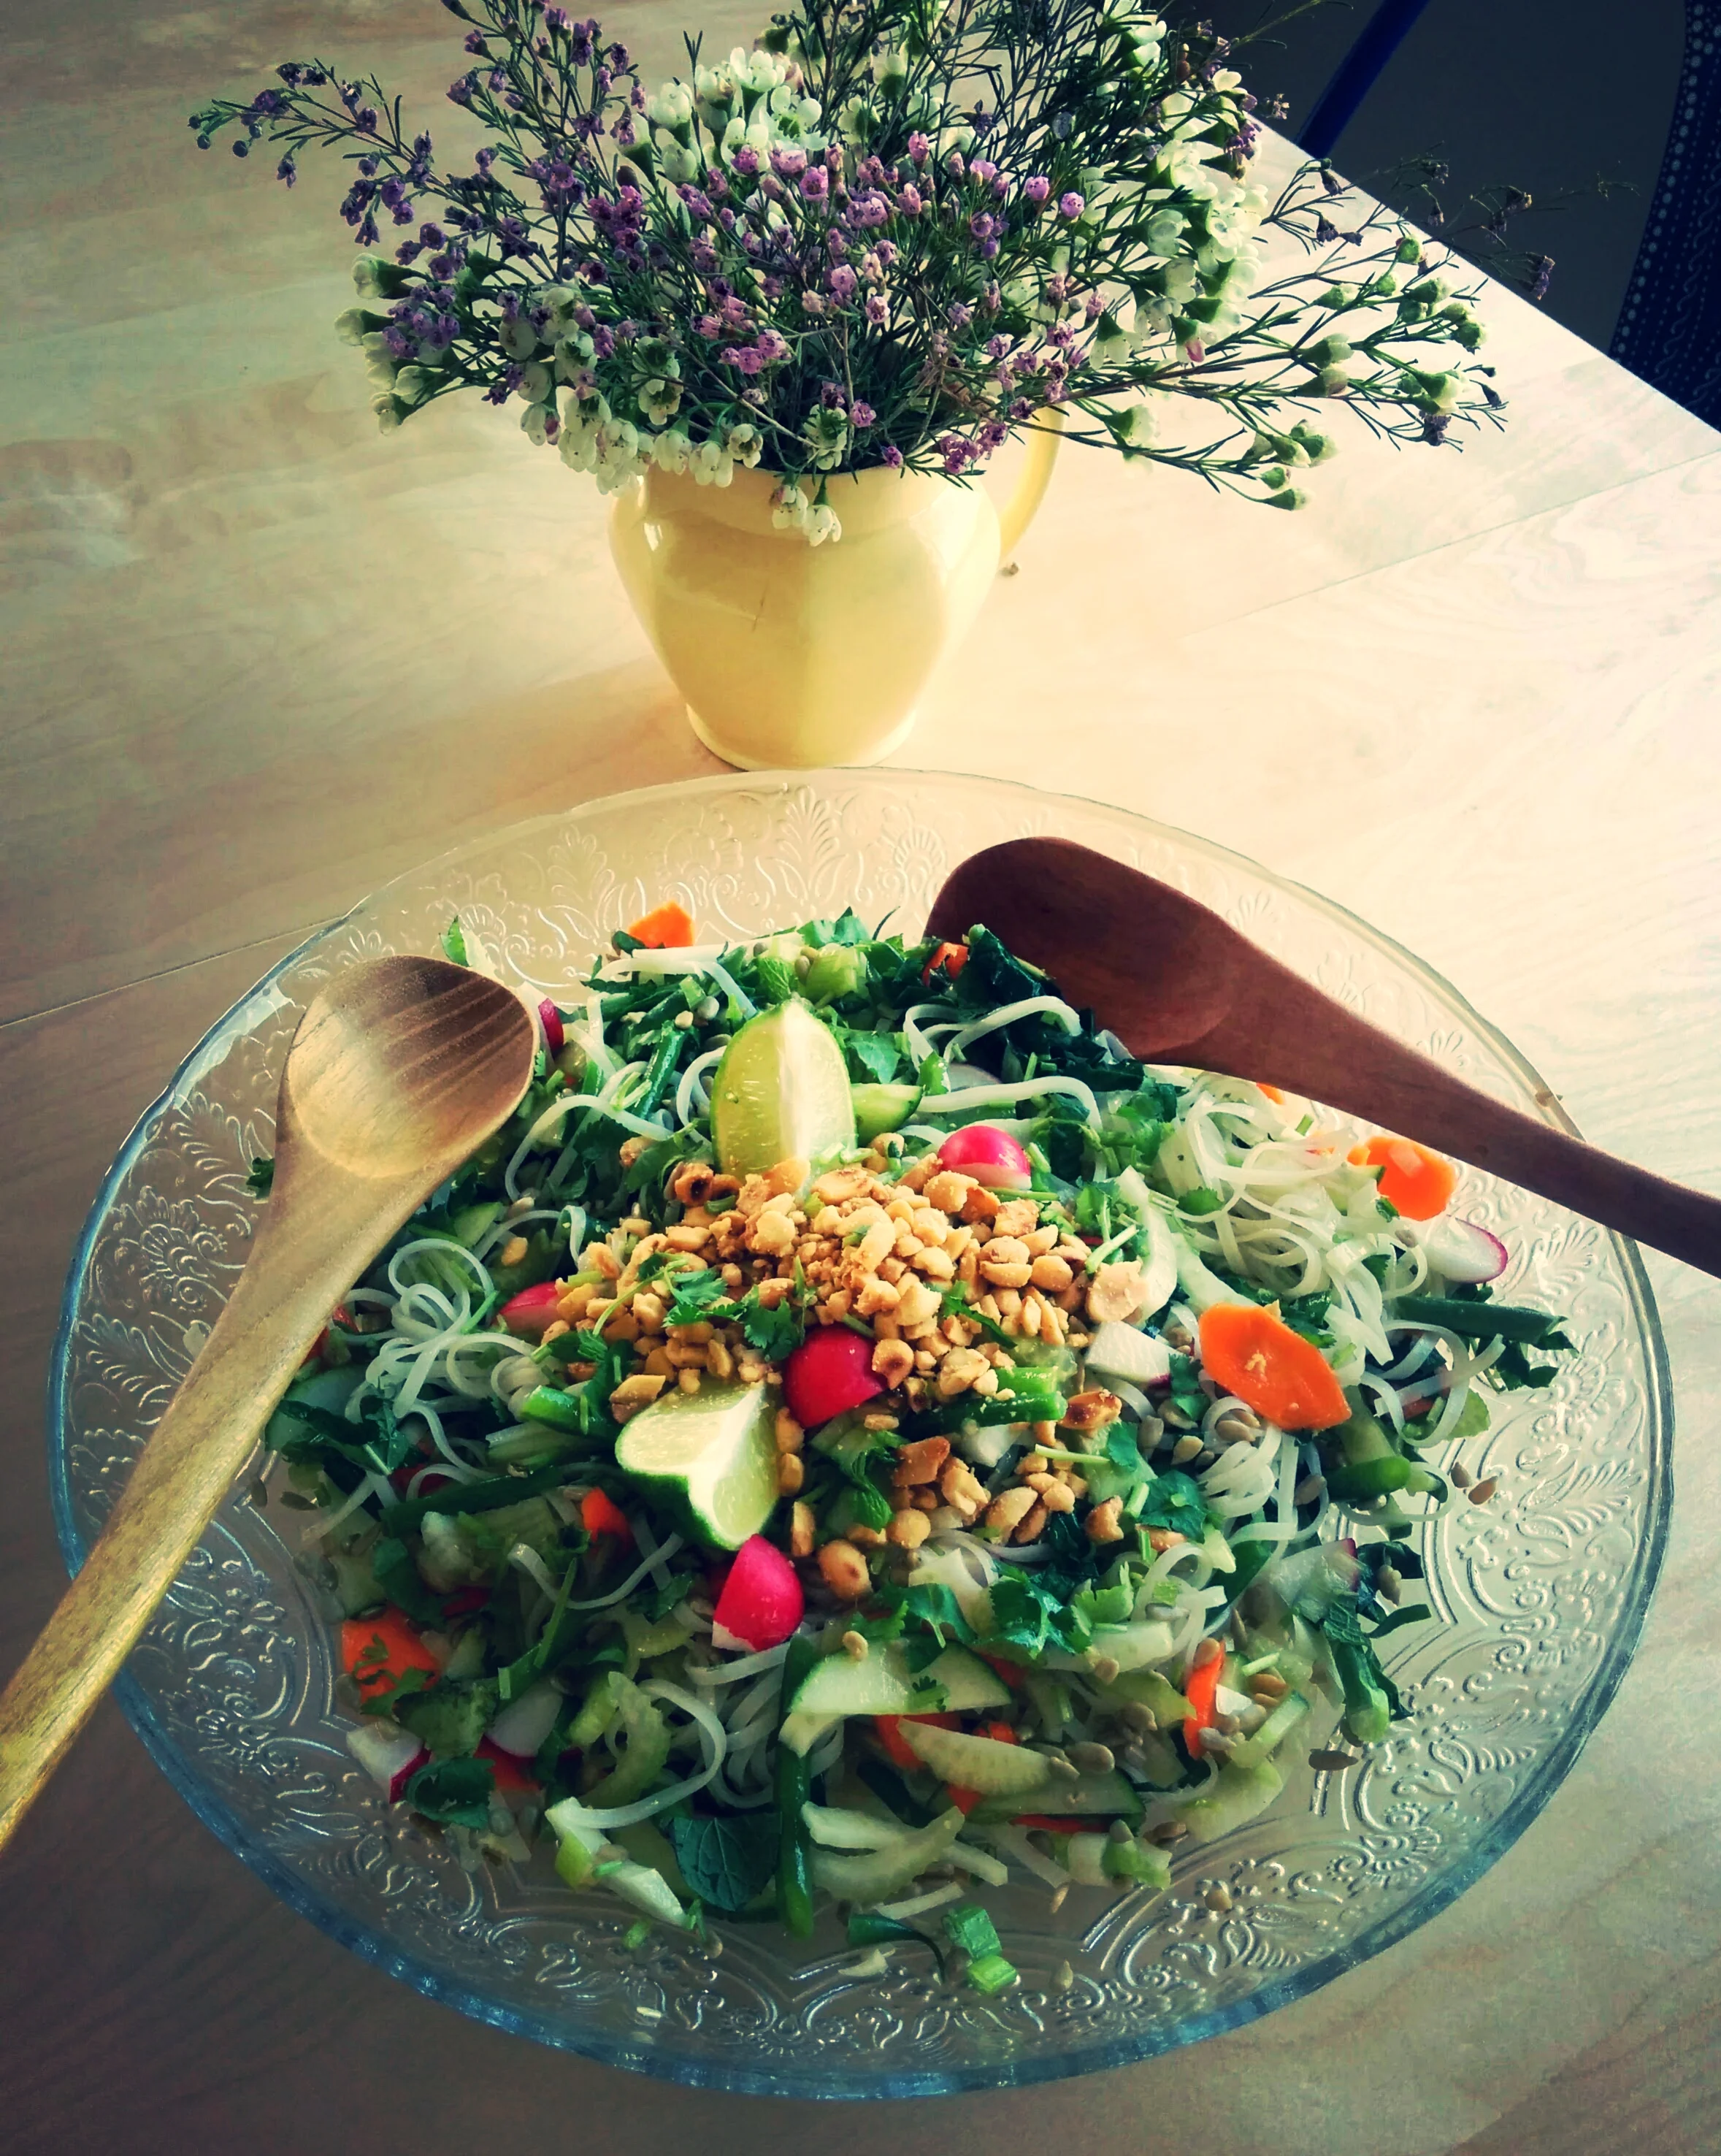
'My Thai'
Who doesn't love that summery flavour of a delicious light colourful Thai inspired salad. It's always the way that I think... wow it's SO much effort, I need to have all the herbs and dressings and it all gets complicated. Well I made it simple and DELICIOUS! I literally used all the veggies in the fridge. The secret to making it amazing is coriander and peanuts and toasted sesame oil, these are the three flavours that for me scream out 'FRESH THAI SALAD'
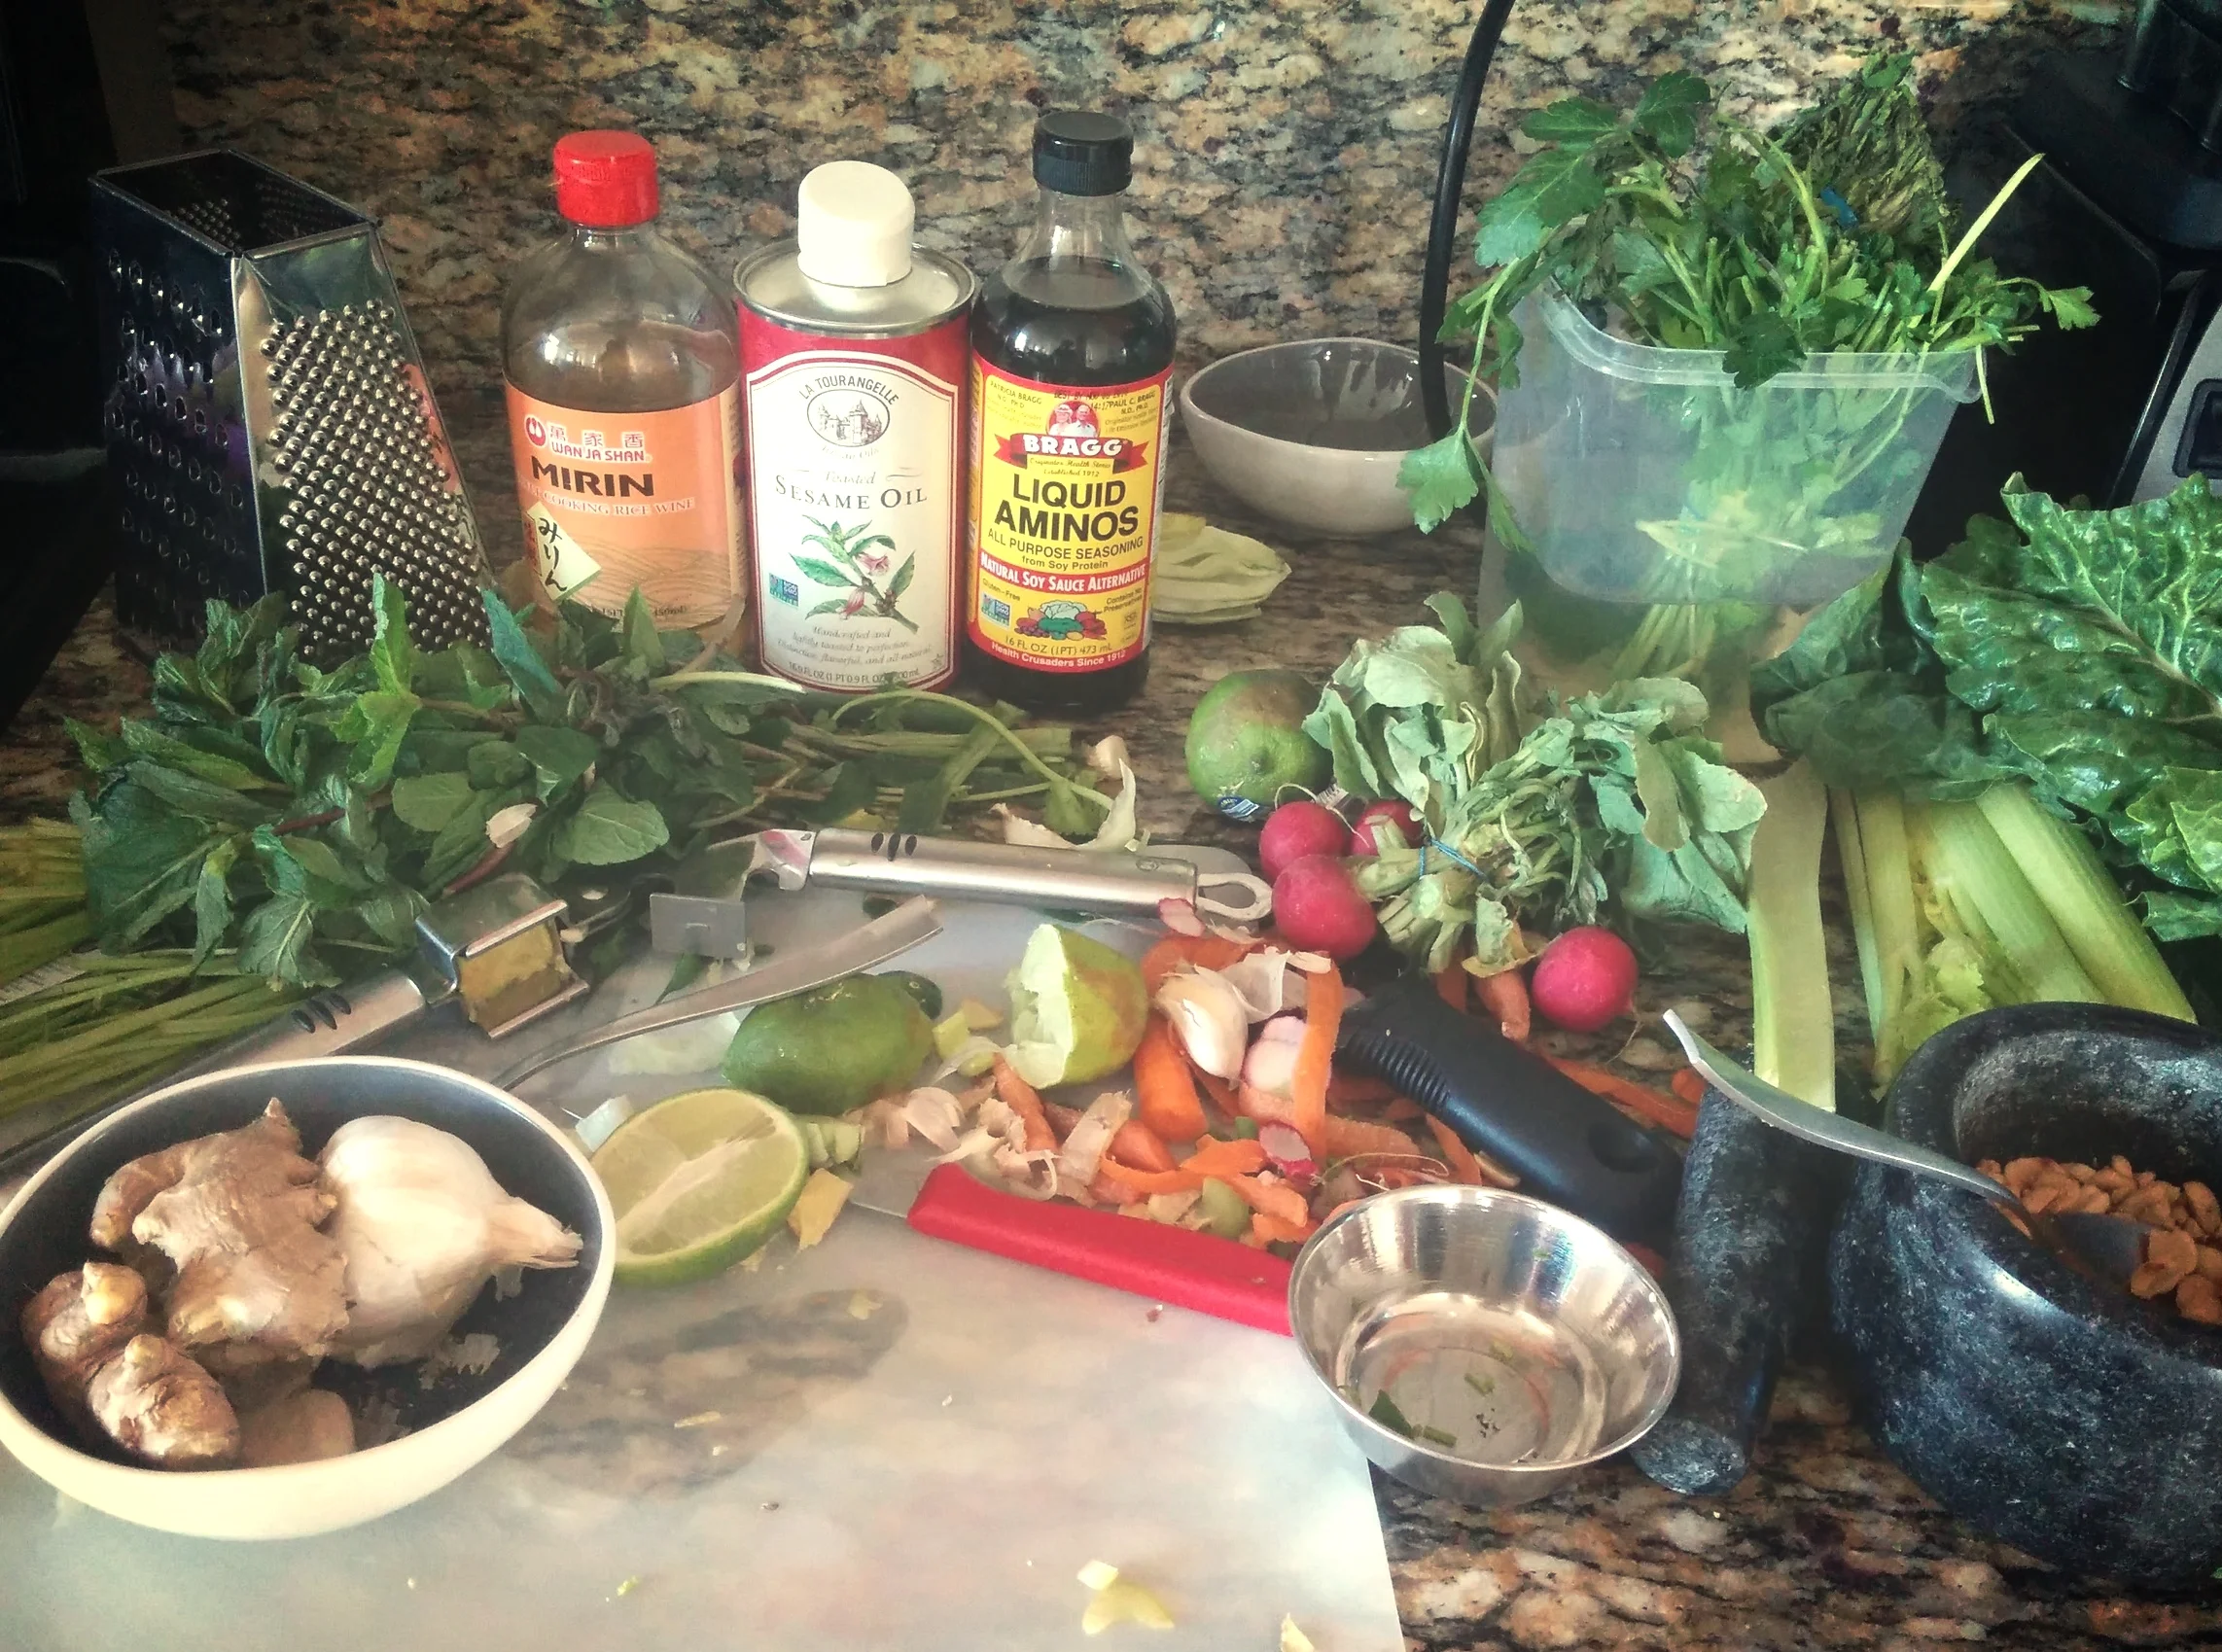
I threw this together for dinner in about 20 minutes, you will need (all veggies are optional, depending on what you have in the fridge, that is what is awesome about this dish, anything works really):
- celery - sliced real fine
- cucumber - - sliced real fine
- radishes - quartered
- collard greens (or any greens you like)
- carrot - grated
- fennel - - sliced real fine
- cabbage (optional) - grated
- coriander - chopped
- fresh mint - chopped
- spring onion
- peanuts (roasted salted are the best)
- garlic - grated
- ginger - grated
- lime - juiced
- a box of pad thai rice noodles, or general rice noodles / pasta
- toasted sesame oil
- mirin
- amino acids ( I use this in replacement of soy sauce or tamari)
The Noodles: It's important to use rice noodles as they are much lighter than wheat and don't get as starchy. Put them in boiling water for a few minutes then drain under cold water and set aside.
The Veggies: Chop / grate the vegetables into a big dish, I gently sauted chopped up greens, you could do the same with kale or whatever else you like, maybe broccoli. It just adds another layer. Let them cool before adding to the veg so not to make the cucumber soggy.
The Dressing: I put a garlic clove and a chunk of ginger (depends on how hot you like your dressings) both grated into a jar, then I added a good slog of toasted sesame oil, a swig or mirin and a swig of amino acids. Just keep adding till the taste makes you go "mmmmm" and you smile a bit feeling chuffed with yourself, like a chemistry teacher :)
Assembly: Put the noodles, veg and dressing all together and mix up, add chopped coriander (and mint, if you like). I warmed up the peanuts in a pan on the stove just to bring out their oils, then crushed them in a pestle and mortar to get them all crushed up.
Serving Suggestion: Pop the peanuts on the top of the salad before serving so they don't go soggy. Chop up a spring onion and sprinkle on top. I then squeezed the juice of a lime on the top as well to give extra ZING magic.
ENJOY :)
coconut. lemon. blueberry. honey.
A winning combo, I kind of made this cake up. Granted it did take well over an hour to bake... I think it's pretty good if you want to have something light and summery without gluten in it. I figured it sounded like a good combination of words when I said them all together, bit like the ice cream sellers on Tel Aviv beach who shout out "artic. mento. chocolat. banana." You get the idea. So I thought... "well, why not try to put them all into a cake!"
What's turned out nice is the texture, it's almost like almond meal, which you could also use as a sub to flour I am sure. The blueberries all sink whilst it's cooking creating almost like a jam like texture when you bite into the cake so it has the lemon flavour then a hit of blueberries as you touch the bottom. It's not too sweet and like everything I make, it didn't take too long.
here goes, you will need...
- 3/4 cup coconut oil
- 3/4 cup honey
- 1/2 cup lemon juice (or I just juiced 1 whole big lovely lemon)
- zest of 1 whole lemon
- 3/4 cup coconut milk (or I guess you could use coconut yogurt too)
- 1 tea spoon of vanilla extract
- 3 eggs
- 1 small punnet of blueberries (it's about a cup)
- 1 1/2 cups of rice flour
- 1 cups of oat flour (I admit I just kept adding oat flour in the end to get the right consistency, so you may need a bit more than 1 cup if it's too liquid. if it gets too thick just add more coconut milk)
- 1/4 cup flaxmeal
- 1 teaspoon baking powder
- 1/2 teaspoon baking soda
How to make it...
- melt the coconut oil, add honey, vanilla, lemon juice and zest - mix with electric mixer
- add 3 eggs, then coconut milk - wisk again till all mixed together
- add the flours / baking soda, powder until a good cake batter consistency, you don't want it too wet.
- spoon in the blueberries
- pop it all in a cake tin lined with wax paper
- oven on 350 / 180 and cook till golden on top and knife comes out clean, it took a good hour, but just keep an eye on it.
voila :)


miso in minutes
So... it goes like this... it's Tuesday, I promised myself I would do food shopping, but life being life it had other plans... What does one make when you open the fridge and realise you have exactly: 1 leek, 1 potato, half a punnet of sad looking mushrooms and 2 spring onions?
Miso Soup of course!
Last night I thought I would be smart and make some adzuki beans to create something today. They came out all mushy and I really had no idea what to do with them, they looked a bit like refried beans, but not... I was trying to think of creative ways to salvage them, perhaps Mexican inspired or something... but that would mean shopping and my little one didn't sleep a wink last night so the idea of battling the supermarket is the LAST thing on my mind. With my hubby away on business, all I want is a hug in a bowl and nothing that takes me longer to prepare than eat!
The magic of miso is you can throw anything into it, it takes no time at all and is always a comforting hug in a bowl. I sauted the leeks and mushrooms, chopped up the potato and added some amino acids as flavour. Threw in my sad looking adzuki beans, filled the pot with water and let it simmer for about 5 - 10 minutes, just enough time to get the potato soft. I ladled out a spoon of broth and added a tablespoon of Red Miso. I love Red Miso it's so hearty and delicious. I gave it a stir and served it up in a bowl with scallions on top. I kids you not, excluding my bean fiasco, this dish took me 7 minutes and is actually exactly what I need today :)


Bad Ass Easter Brownies
" Why does licking the spoon of the brownie batter never fail to make one so utterly and sublimely happy? " Perhaps it's all the sugar and butter? WRONG!!! it's the amazing coconut oil, coconut sugar and 80% bittersweet chocolate that makes this mixture so incredible!
These took be approx 7 minutes to whip up (for my sins, I used the microwave) but when you have a baby strapped in the 'week end' sling and you have a play date with your toddler, you really don't have time or extra arms for pots and pans.
This was a one bowl, one spoon show and full of pleasure. Like all my cooking, I took the recipe from a variety of online links with 'no sugar' in the title, then bastardised them all to come up with the following. Granted these are not 100% totally sugar free as the chocolate has SOME sugar in it but, guys... live a little it's Good Friday! Who needs an Easter bunny when you have these Bad Ass Brownies!
- 5 table spoons of coconut oil
- 3/4 of a bag of bittersweet chocolate chips (the bag is 10oz)
- 1/2 cup coconut sugar
- 2 eggs
- pinch salt
- 1/3 cup oat flour
- 1 teaspoon vanilla essence
Put the oil and chocolate into a bowl and blitz in the micro for 30 seconds, stir then another 10 seconds at a time until the chocolate melts - DO NOT COOK YOUR CHOCOLATE!!! Add the sugar and stir, add the vanilla, pinch of salt and eggs, stir. Then add the flour and beat up for about a minute so the batter is nice and smooth.
I threw in a handful of chocolate chips and walnuts for fun. Put in a tray in the oven - to be honest I didn't even check the temp, I think it was 350 / 180. i baked for 20 minutes. Took them out and am now eating them whilst they are still hot.... YUM!!!

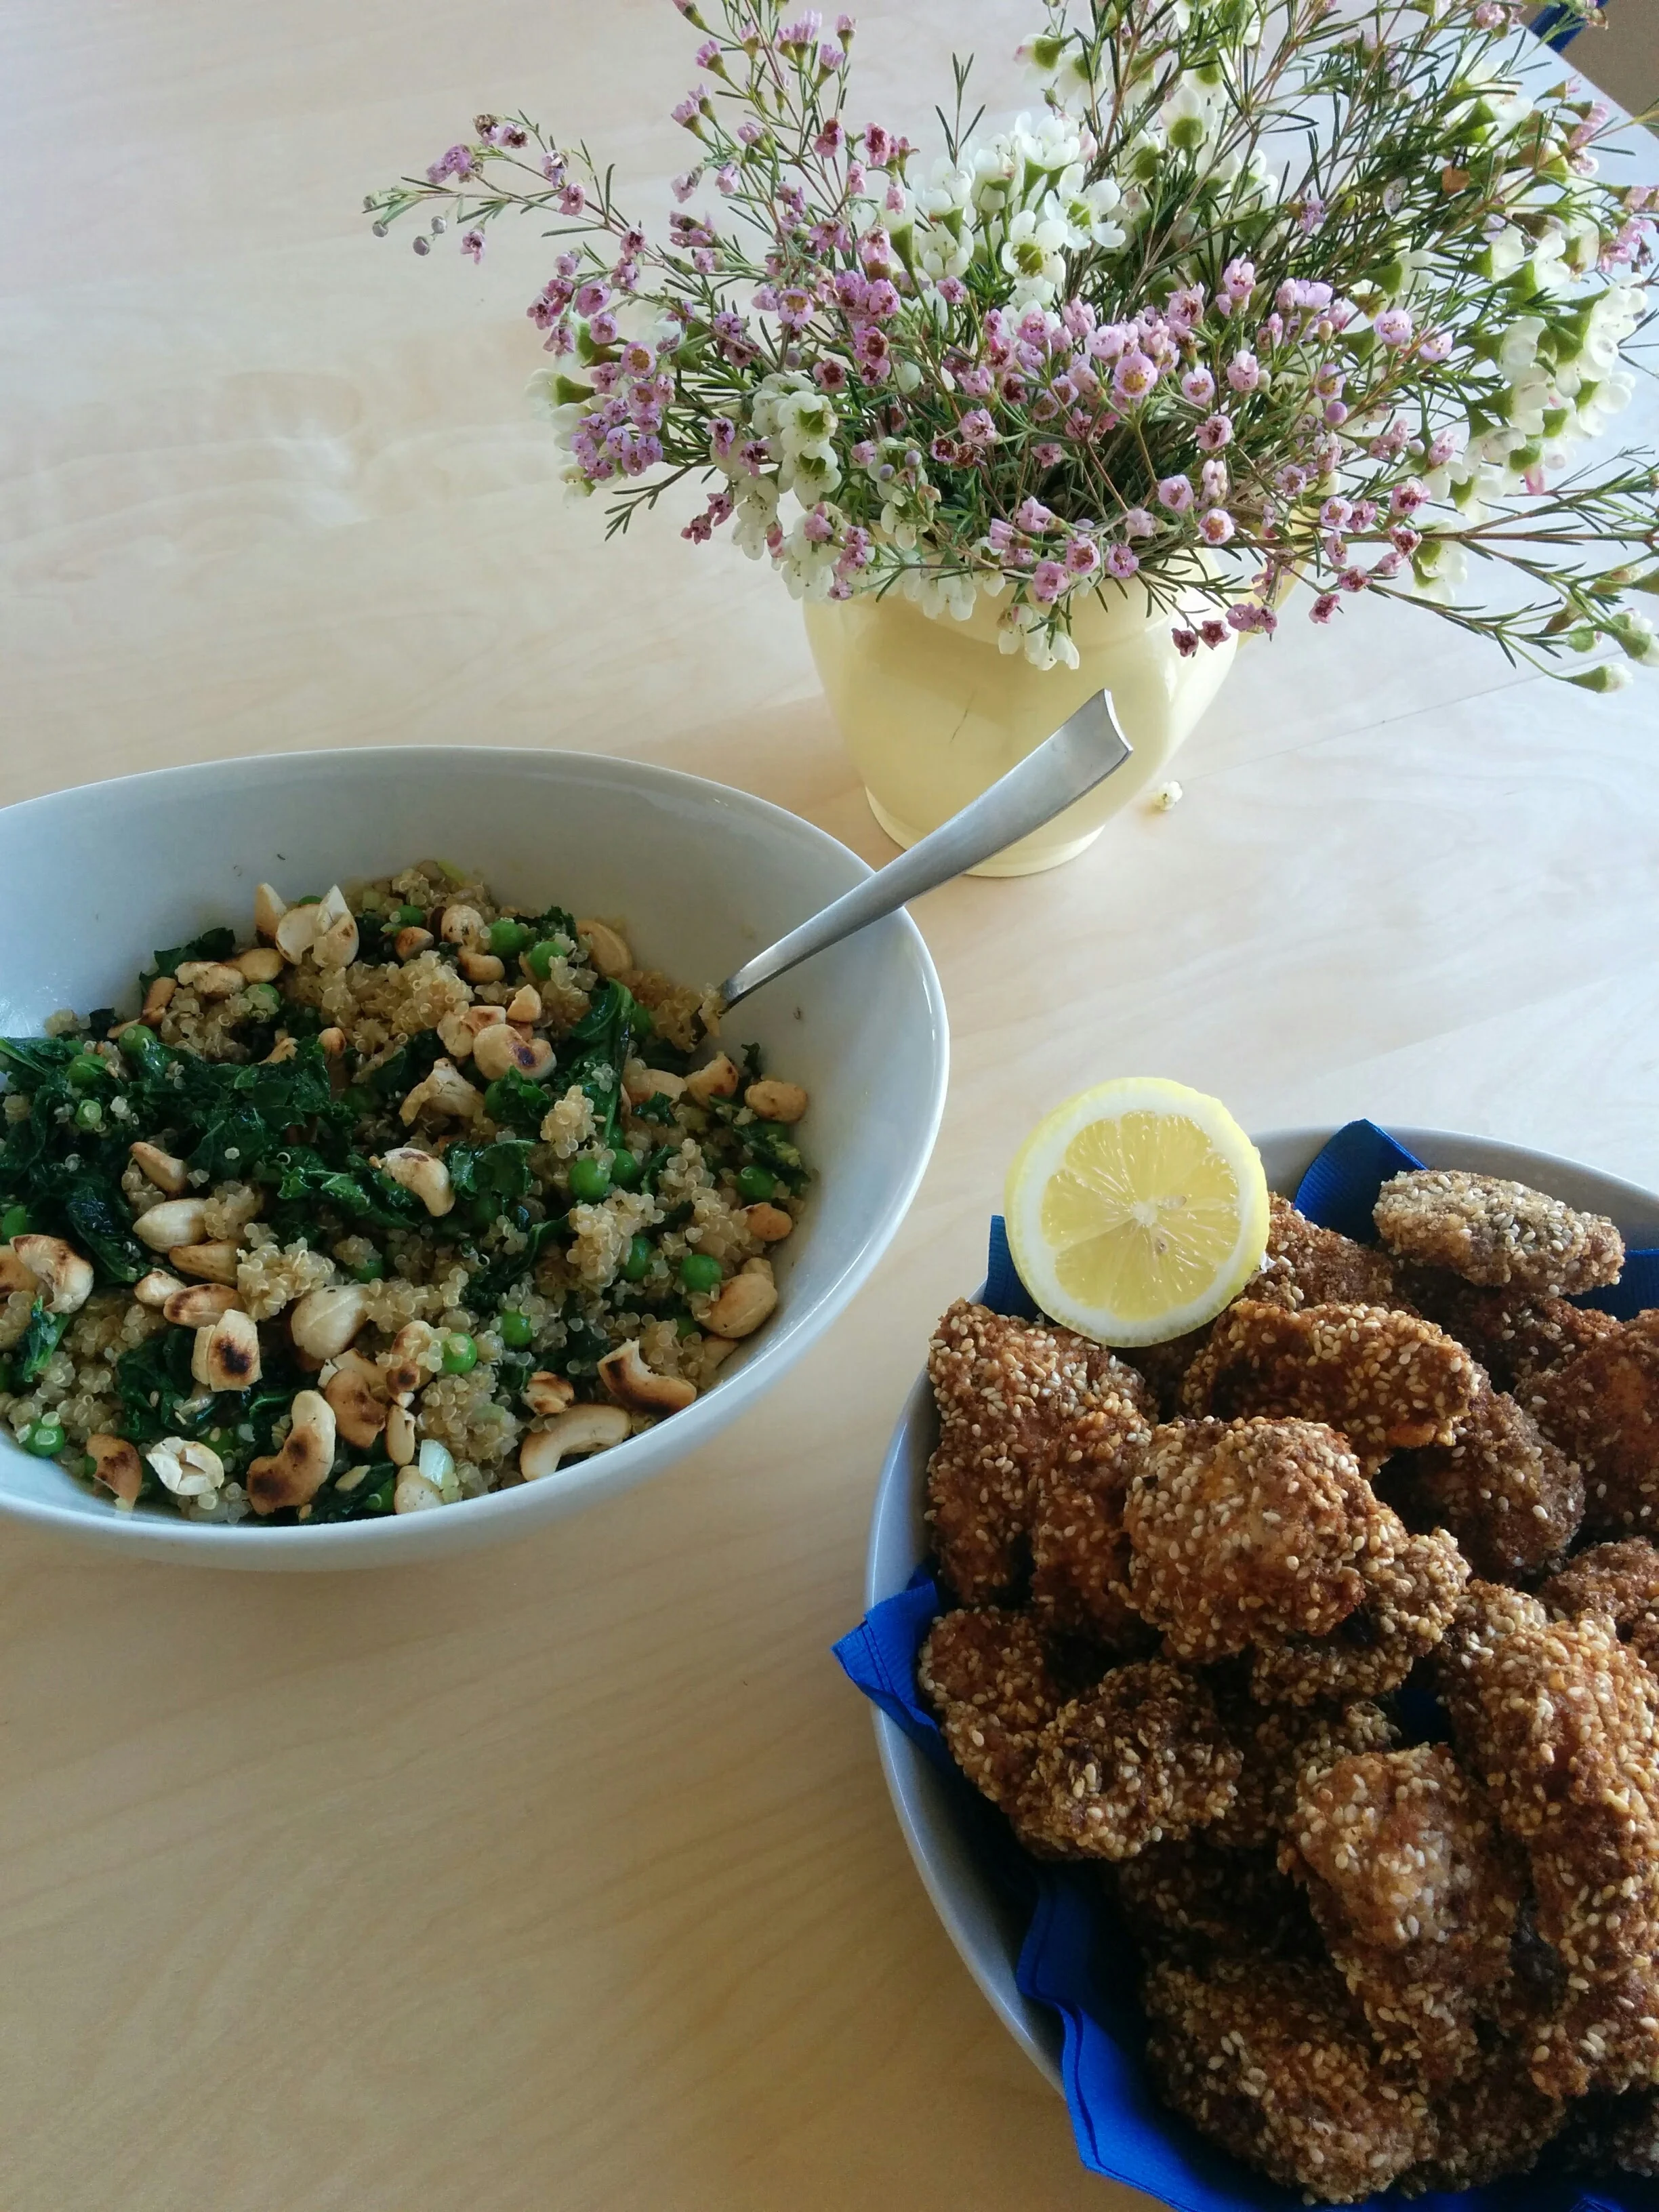
Nuggets of Gold...
Mondays are always a headache, whether you are in the workforce or at home... Having so little time to prepare meals, I have made it an intention not to let that compromise both my passion for cooking and wellbeing combined. This Monday I made up a new way of making chicken nuggets. Which kid doesn't love them?! Reno (my eldest son) literally ate 10 of these.
Home Made Chicken Nuggets made with Ground Flaxmeal, Sesame Seeds & Wholemeal breadcrumbs. Served with a side of Quionoa, petit pois, kale, toasted cashew nuts and a simpe dressing of avocado oil and lemon juice.
Milk'n Cookies...
Who doesn't LOVE cookies?... I do, and being on a predominantly 'no refined sugar diet' makes it tough to find good cookies that are fast and yummy with a real crunch to them rather than the usual 'soggy biscuit' effect after 24 hours in the jar...
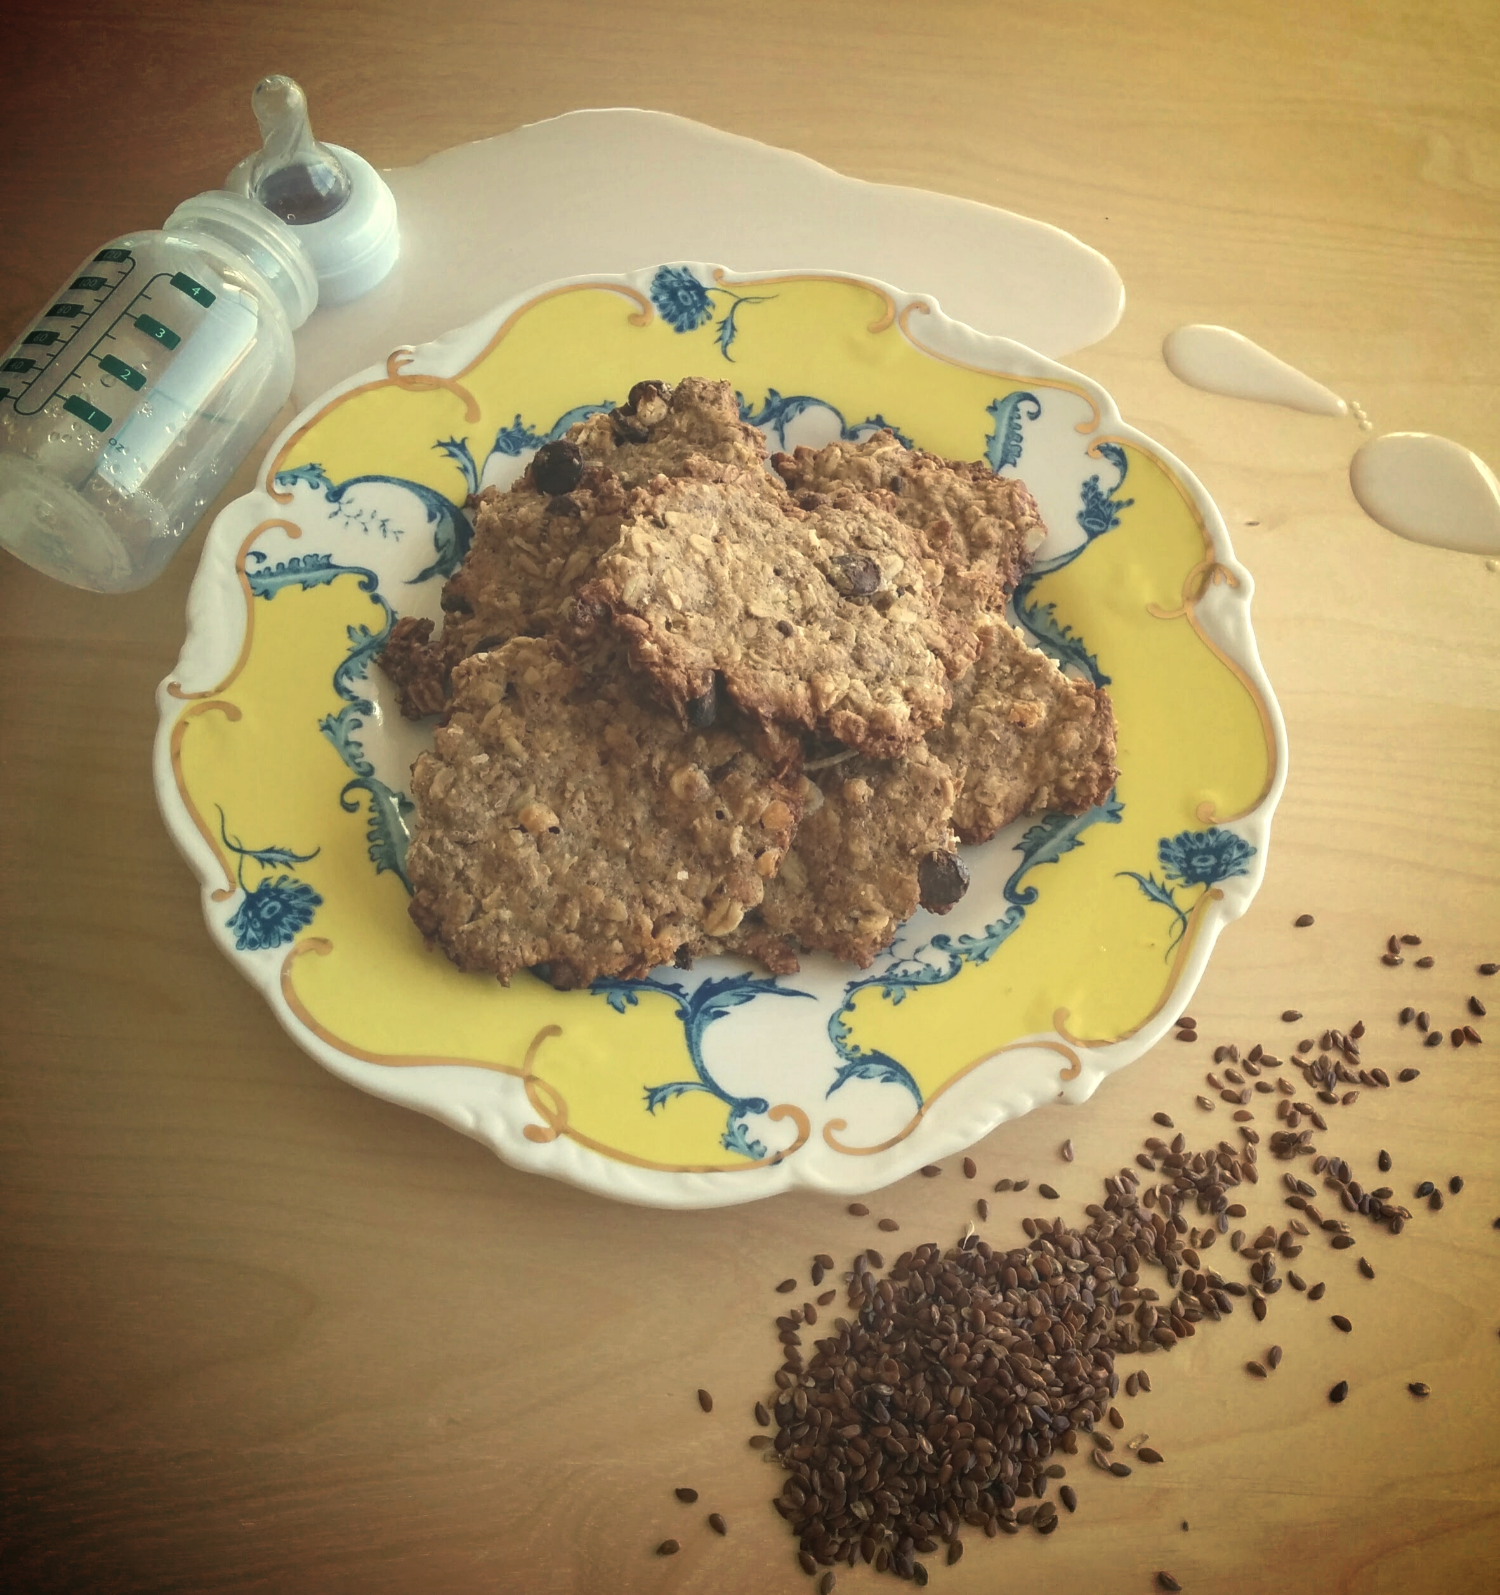
I decided to try out the magical 'lactation Cookies' to see if milk really did start pouring out of me. Just so you know... it didn't... nor for my hubby ;)
What I did learn is that these little chocolate chip, coconut, oatmeal delights are delicious, not too sweet, super easy to make and full of great stuff if you are breast feeding or not. The secret is brewers yeast - it's PACKED with vitamin B's which is great for new mum's but also normal folk. They are great for metabolism, keeping you going. Good for hair, nails, skin, helps to break down carbs into sugars, the list is pretty long...
The other thing I like about these cookies is they contain oats and flaxmeal, both of which are brilliant for keeping the body in good function, full of fibre and slow release energy.
So, being my, I bastardised a collection of recipies to come up with the perfect cookies. My favourite recipe I found for these that was easy to make was these 'oatmeal chocolate chip lactation cookies'
What I changed was - I HALVED the sugar - so only 1/2 a cup TOTAL. i also used Coconut sugar instead of refined sugar. If I didn't have that then I used maple syrup, rice syrup or honey. I also doubled the flaxmeal and used in as half the flour substitute and then threw in a more generous serving of brewers yeast - it's not everyone's favourite taste, it does have a flavour to it, so up to you if you want more or not. I also replaced the butter with coconut oil and added a little almond milk as the flaxmeal makes it a lot dryer.
In Short:
mix in a bowl: 1/2 cup coconut sugar & 1/2 cup coconut oil (I melt the oil it makes it faster!)
add: 1 teaspoon of vanilla extract and 1 egg, 1/2 baking soda, 1/4 teaspoon baking powder, 1/4 teaspoon nutmeg, pinch salt,
Stir in: 1/4 cup almond milk and 1/2 cup flaxmeal & 1/4 cup brewers yeast - mix all together
add: about 3/4 cup of flour, i use wholemeal, or just enough to get a nice dough mixture. Remember you are going to now add: coconut flakes - i just pour them in, it's about 1/2 cup. Same for chocolate chips (I use the bitter sweet 80% dark chocolate ones, they have less sugar and it's just a welcome bite when you eat them)
stir in: 1 1/2 cups of oats. if it's dry just add more almond milk or more oats / flour etc...
Then I sit it in the fridge for 10 minutes to chill out whilst I clean up the mess and put the oven on (about 350 / 180) as i ALWAYS forget to do that! Put a teaspoon of mixture on a tray with baking paper and a bit of oil. then I press them out as flat as i can get them without them falling apart - this is the secret to getting the CRUNCH! Bake till golden - about 15 minutes.
Always have a batch of these in a jar - very good if you are on the run or fancy something sweet without too much 'sweet'
